How to:
Take a Headshot with an iPhone
Written by Aidan Hennebry | Professional Photographer
That cell phone in your pocket is a pretty powerful camera, in case you didn’t know. While I’m a huge advocate for hiring a professional to help you out (I am one, so I may be biased), sometimes you just don’t have the means.
Below are a handful of tips / tricks / principles to help you make the most of your iPhone when it comes to taking a half-decent looking headshot. Yes, art is subjective. No, these are not rules you must obey. But if you don’t know what you’re doing and you just need something to hold you over, consider everything below as my best attempt to help.
1. Clean Yourself Up
The first step to looking good in a photo is to… look good. No, you don’t need plastic surgery, but some things as simple as putting on a little makeup, choosing a nice shirt, combing your hair, shaving your face, all go a long way in a final photograph.
Now I’m not telling you put on enough makeup to make a clown jealous, or wear a shirt tight enough to rival Dwayne Johnson (although to be fair if I was that jacked I’d probably wear a shirt that tight too), but being conscious of what you’re wearing in your photo is important.
Your appearance sends subliminal messages not only of what you think of yourself, but of what the viewer should think of you. Consider every detail thoroughly.
I always advise avoiding overly distracting patterns or immediately recognizable logos. Colour is not bad but it can become visually exhausting if this is the same head shot you hope to use for years. Tread with caution in colour.
2. Get Someone to Help
Yes, if you try hard enough and own a tripod or something, you can definitely do this without the help of someone else, but I’m going to suggest you get someone to help you for a few reasons:
First, they can be your spotter for things like stray hairs, weird wrinkles in your shirt, spice in your teeth, you name it. Another set of eyes always helps with tiny details.
Second, and most importantly, if you’re only using your iPhone, the rear phone camera is 10x better in every way than the selfie-camera. I’m not exaggerating to say the difference is large enough to justify asking someone else to help you. Do not let your insecurities stop you from asking a friend (or spouse) for a helping hand.
Third, if you’re taking my advice above, shooting with the rear-camera and not being able to see yourself really makes it difficult for your composition, exposure, and expression. It’s pretty much a necessity to enlist the help of someone if you’re going to follow Step Two.
3. Find Good Lighting
Because we’re not going to be renting studio strobes to help light you like a model, it’s important to use the best free source of light we can find (the sun). But don’t be fooled: not all light is created equal.
To save you from a ten-page lecture on what constitutes good and bad light, I’ll jump straight to the application.
If shooting indoors:
The good lighting you should be looking for here is soft window lighting. A window where the sun is being reflected into the house (a North facing window in most parts of North America) or a window on the side of your house opposite where the sun is at that moment in the day. If you live in an apartment with windows facing in one direction, your best bet would be to wait for the right time of day to take your head shot. Direct sunlight coming through a window is NOT good lighting. Also: turn off all other lighting indoors (ALL other lighting). If the shadows on your face are still too deep with only window light, use a big white surface (a pizza box can work) to reflect some light back into the photo just outside of the frame.
If shooting outdoors:
If it’s a bright and sunny day, you’re going to want to find wide open shade. Beware that underneath trees can cause you to have a green tint to your skin tone that feels unnatural. Best bet: the shadow of a big building with a paved parking lot, or something similar. The parking lot (gravel or paved) will reflect more neutral-coloured lighting back into your face than grass would.
Generally speaking, if you’ve got the time to wait, an overcast day will yield the best results. Overcast lighting is soft, it’s even, it’s the same exposure level as your background. It will make your life easier to wait for the right weather.
First image: brutal, overhead, artificial lighting. Second image: better, softer, window lighting.
4. Chin Up, Buttercup
No matter who you are, at whatever weight you are, it’s practically a stone-cold fact that the most flattering angle to capture a portrait of your beautiful face will be from slightly above your eye level, where your face has to tilt up to be looking at the camera. Get your photo assistant to be slightly above your eye level. Bring a step ladder if you’re unsure you can find something to stand on. I actually do this from time to time!
Looking up elongates the neck and, more importantly, helps define your jaw line a little more clearly. You don’t want to be looking STRAIGHT UP to the sky or you’ll be stretching your neck and losing all the benefits of doing this, but a bit of an angle from your natural resting position is going to do wonders.
Don’t believe me? Take a selfie with your phone in your lap. Yikes. Lighting is awful (your face is likely under exposed) and you’ve probably got 4 more chins than usual.
Enough said. Keep your chin up!
Neither of these is a great photo still, but notice the difference in overall feel from one image to the next.
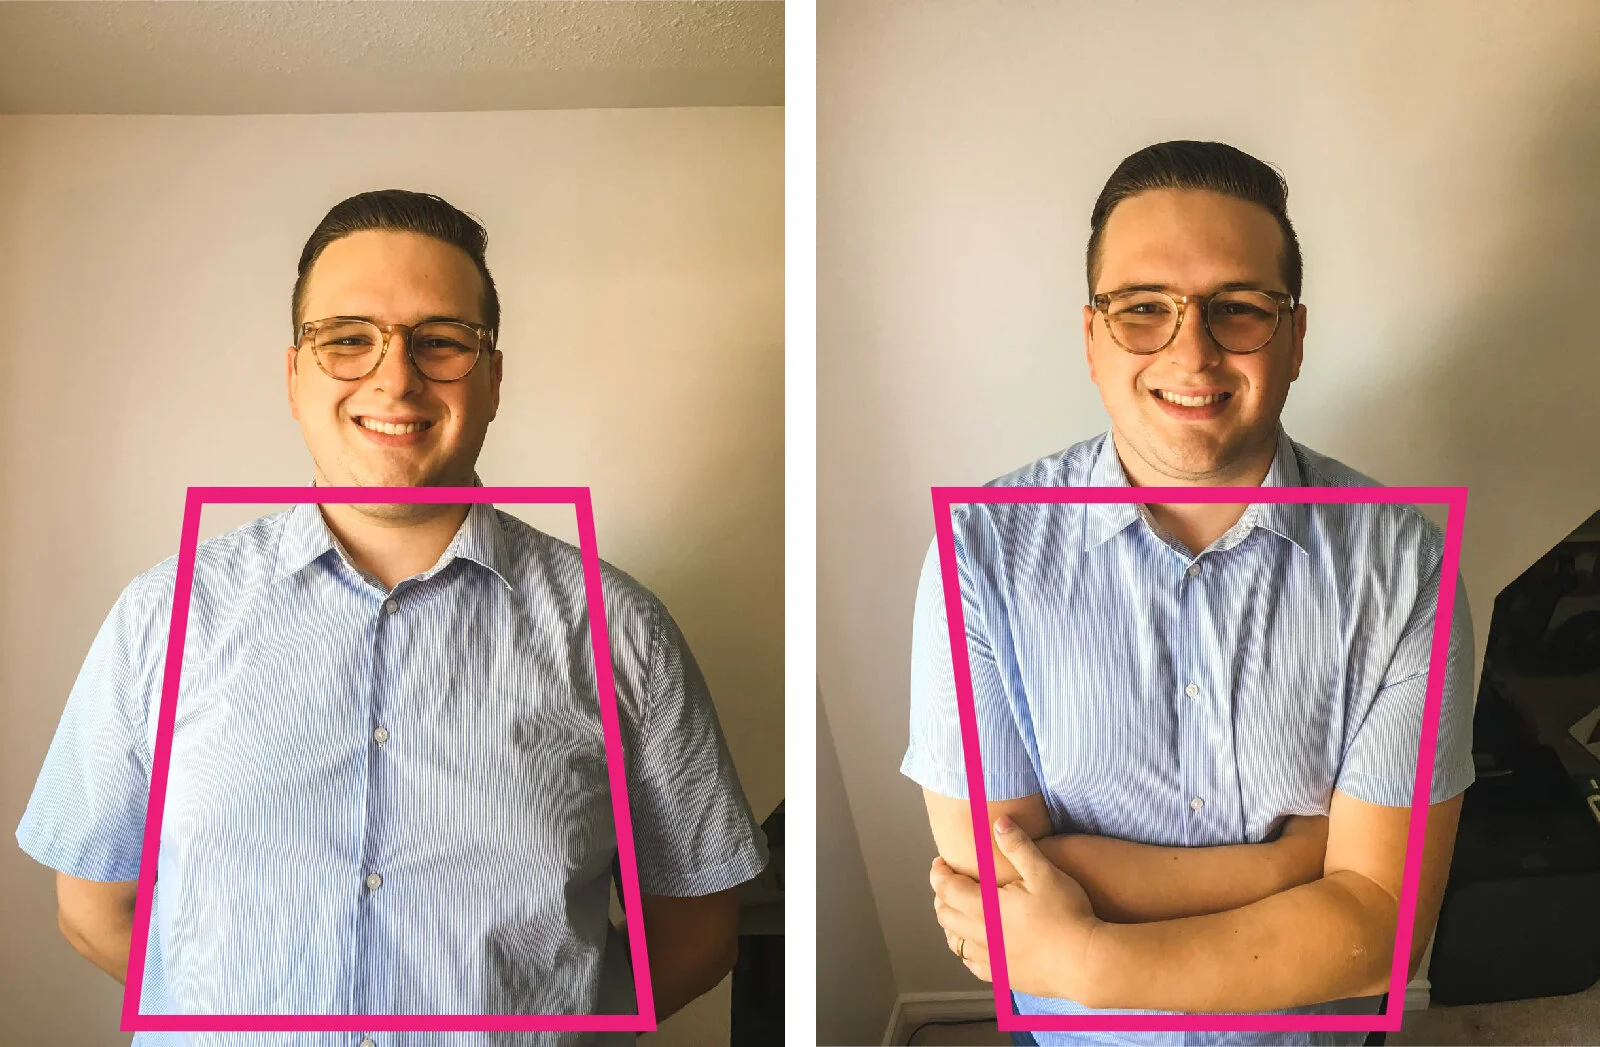
Another thing about taking a photo from above vs below is the feeling of balance and dominance. Below I briefly illustrate the different shape my body takes on depending on the angle you’re shooting from.
I’m already not a super tiny guy, but notice how one photo makes my body / mid-section look gigantic, and the other one is more slimming? That alone is reason to change your shooting angle (just don’t go as extreme as I have here to make a point).
5. Consider your Distance
A head shot, by definition, is a photo primarily composed on your head. That doesn’t mean it absolutely cannot include a bit of your shoulders or arms, but generally speaking, you probably want to keep the emphasis on your face.
Most cell phones have a 28mm focal length. This is really great for landscape photos, but it can lead to issues when taking portraits. You lose all of the compression that a 50mm or 85mm lens would provide. That being said, we’ll make do.
First: I really, really don’t recommend zooming in on your phone very much at all. All you’re doing is cropping the photo, because cell phone cameras don’t have optical zoom (where the lens is physically moving). Notice how the quality becomes positively dreadful the more you zoom? It’s because you’re not zooming: just cropping. I rest my case.
Second: don’t put too much (or too little) space between you and the camera for your headshot. I would suggest an absolute minimum of 24” (the length of your arm) and a maximum distance of 4 feet. Again - it’s all subjective, but people want to see your FACE in a headshot, so don’t feel the need to include your knees and everything behind you in the final photo.
6. Un-distract Your Background
If you’re unsure what you’re doing and just want something simple and straightforward: choose a simple background that isn’t going to be a visible element in your photo. If you choose to stand in front of a wall, stand AT LEAST 3 feet away from it or you risk having a weird shadow on it (like I did here lolololol). Standing too close to the wall can start to resemble a mug shot.
If you’re a little more comfortable and want a background with a little more personality: shooting on location (in a library or your home office) isn’t out of the question, but (again) be aware of what it conveys about who you are to the general public, and what the lighting situation is like. Shooting in a graffiti-covered alleyway might not make sense for an accountant. But if you’re a muralist, it’s a little more logical.
Either way: beware of foreign objects “sticking out” of your head. These can be super distracting.
First photo: What the heck is all that stuff?! Second photo: Simpler background.
7. Angle Thy Body Just a Little
So we’ve established that we want to avoid a mug shot photo. Easiest way to do that right off the bat? Angle your body a little bit from the camera and turn your head back to the camera.
I love Wes Anderson——the famous movie director. Dude has an immediately recognizable style that involves a ton of balance and symmetry. Each of his shots is meticulously planned to the inch.
While his cinematography style is really fascinating, it kind of snaps you out of the movie you’re watching. Why? Real life isn’t so symmetrical.
This tip is really about creating depth, and not keeping everything flat and two-dimensional. Not being perfectly symmetrical will create an organic and natural energy in your photo (however subtle it may be).
This one is subjective, sure, but I think the results speak for themselves.
8. Post Processing Ain’t Cheating
So after you’ve done all the above, if you want to go the extra mile, I highly suggest editing the photo you just took. My favourite phone editing app is Snapseed. If you adjust things like your White Balance to be correct (not too yellow or blue), add a little saturation, and brighten the photo up just a touch, chances are you’ll have a really fantastic photo on your hands (kind of literally).
Don’t overdo it with post processing. It’s easy to get drunk on all the cool (cheesy / garbage) effects packed into an editing app. Don’t fall prey. Keep it simple.
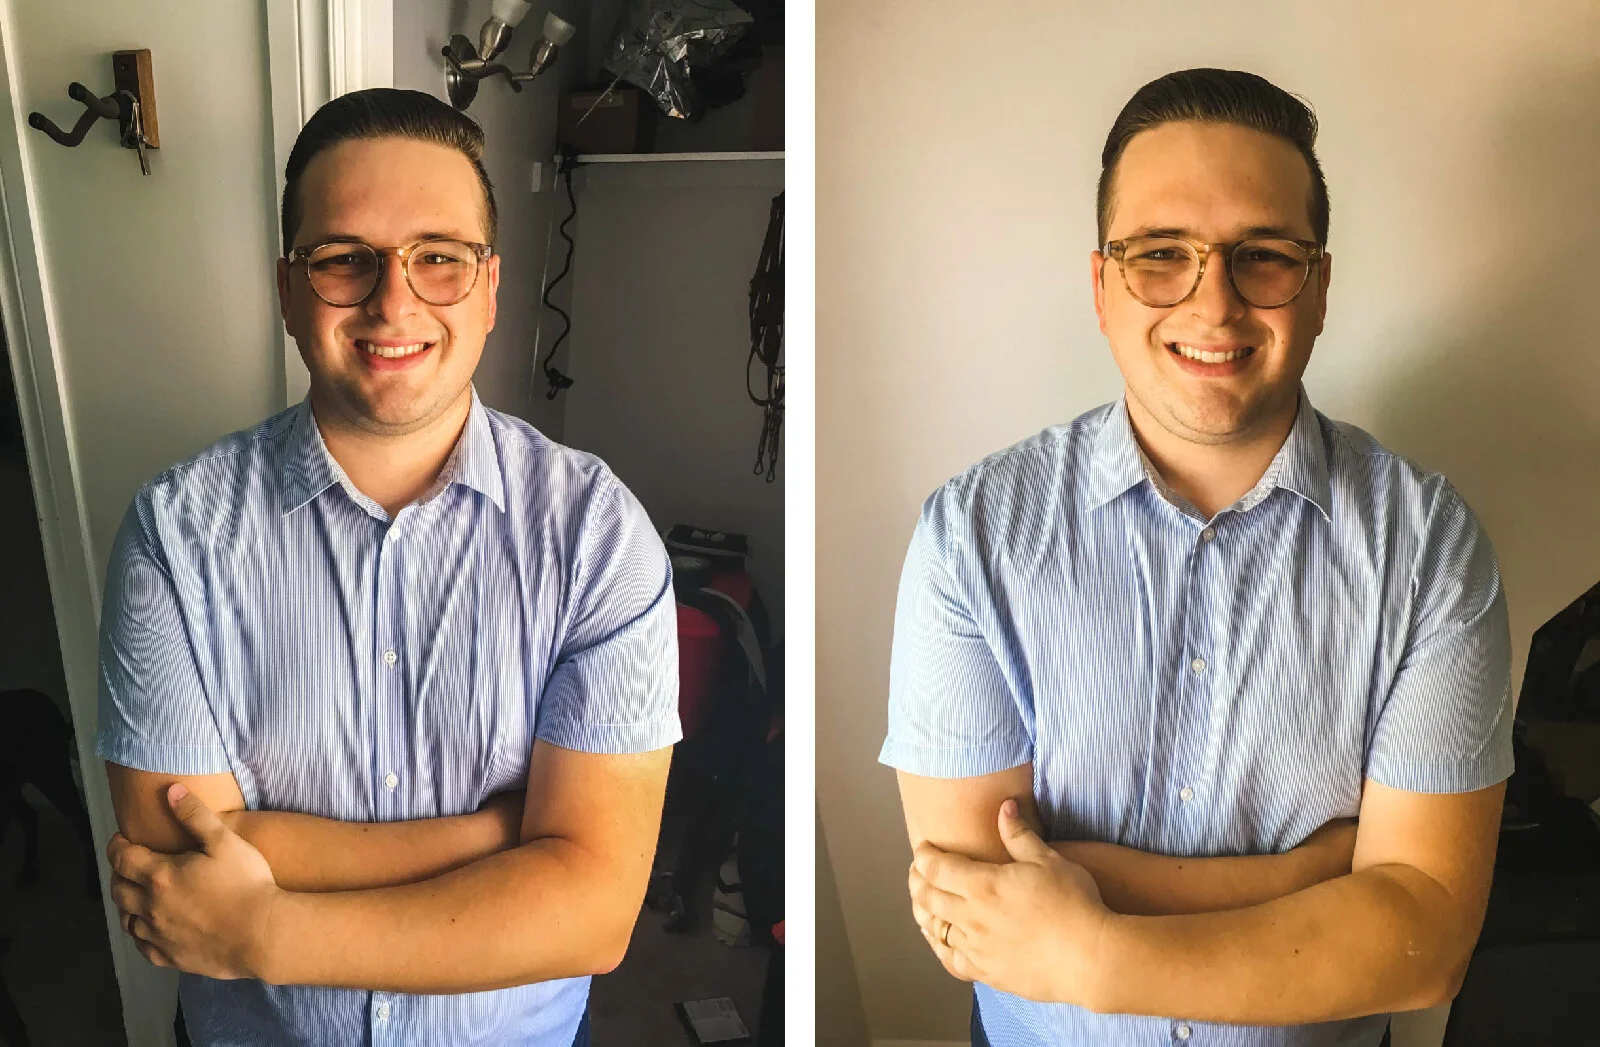
First photo: underexposed a little, white balance is off, little colour. Second photo: brighter, whites are white, shirt is blue.
9. Maintain Maximum Quality
When taking your photo, editing it, saving it, or sending it, make sure you maintain as much quality as possible throughout.
When editing your photo, don’t edit it too much. If your exposure was way off or your colours totally wrong, there’s only so much you’re going to be able to do to save it. It is better to take another photo if the photo you’re trying to edit looks nothing like you hope it will.
Save your photo at maximum resolution / quality any time your photo editing app asks you to. Your publisher will thank you for this. We can always scale down an image, but you can never (truly and without quality loss) scale up an image.
Note: Sending a big photo can sometimes make your email choke. You can always send it via Dropbox or Google Drive or something if needed. It’s best to check with the recipient if you’re having issues sending it (although, with a cell phone photo, I would be surprised if you actually did).
Boom.
Getting a good head shot with your iPhone is somewhat difficult but not at all out of the question. Follow these tips here and you’d be surprised just how fantastic your photo could turn out.
Bonus: Professional vs Phone
Remember at the beginning of this tutorial when I told you hiring a professional is still going to yield better results than photos with a phone?
Proof is in the pudding, folks. Just check out the difference between my best-of-the-best iPhone photo VS one that a professional would take.
You don’t necessarily need to hire me, but I hope that it’s pretty clear that there’s so much more going on when a professional is taking the shot. I know, I know: money. But a good head shot is an investment. It sends a huge message that you are a professional because you work with professionals. This is a relatively inexpensive way to immediately increase the way people perceive you.
Left photo: iPhone best-case scenario. Right photo: taken with a real camera + edited properly.
All of this being said, if you do want to hire me and you’re local to the Southwestern Ontario area, feel free to shoot me an email at aidan@hennebry.ca and we’ll set something up!


